Reverse Engineering using AI (IDA Pro + Claude Code)
I. Introduction
Reverse engineering is one of the hardest things I had to learn during my training for incident response, from jumping into calls to learning the registers.
However, my training was six years ago and a lot of technology has evolved since then, particularly AI. In this blog post, I will try out the basics of using an LLM to analyze binary files.
No LLM can replace the skill of reverse engineering a binary. Hopefully this does not lessen anyone’s interest in learning it manually, but trying out new technology wouldn’t hurt.
II. Requirements
- IDA Pro 9.x or later
- IDA MCP - https://github.com/mrexodia/ida-pro-mcp
- Claude Code
- An executable to analyze
Note: If you do not have IDA Pro, Ghidra can be handy and an MCP is available for that as well.
III. Installation
This assumes that you already have IDA Pro installed. You can always ask claude code to assist with the installation.
1. Install uv
irm https://astral.sh/uv/install.ps1 | iexThis drops uv.exe, uvx.exe, and uvw.exe into %USERPROFILE%\.local\bin.
uv is a fast Python package and environment manager from Astral.
2. Activate idalib
idalib is the headless IDA library. The activation script records where IDA lives so the MCP server can find it:
uv run "C:\Program Files\IDA Professional 9.0\idalib\python\py-activate-idalib.py"Adjust the version number in the path to match your install.
3. Install the package
python -m pip install https://github.com/mrexodia/ida-pro-mcp/archive/refs/heads/main.zipThis pulls in ida-pro-mcp along with its idapro and tomli-w dependencies, and puts an ida-pro-mcp command on your PATH.
4. Install the plugin and client config
The installer writes the IDA plugin and registers the server with your MCP client:
ida-pro-mcp --install claude-code --scope global5. Restart and connect
- Restart IDA completely so it picks up the new plugin.
- Open your target binary and let auto-analysis finish.
- Start the server from
Edit → Plugins → MCP. It begins listening on port13337. - Restart your MCP client. Tools are loaded when a session starts, so a session that was already running when the config was written will not see them.
IV. Testing / Usage
I tested the LLM using the Opus 5 model on the medium reasoning setting.
For the testing I used three executables: two ELF64 x86-64 files and one PE32+ (x64) executable.
The task was to run a simple crackme challenge and have the model find the key. Full credit for the crackmes goes to their original authors.
I have linked the challenges below if you want to try them yourself. The password for all files is “crackmes.one”.
Test 1 - Secret key
| Field | Value |
|---|---|
| File name | code |
| Author | RR7 |
| Difficulty | Easy |
| Link | Crackmes |
| Download | Direct Link |
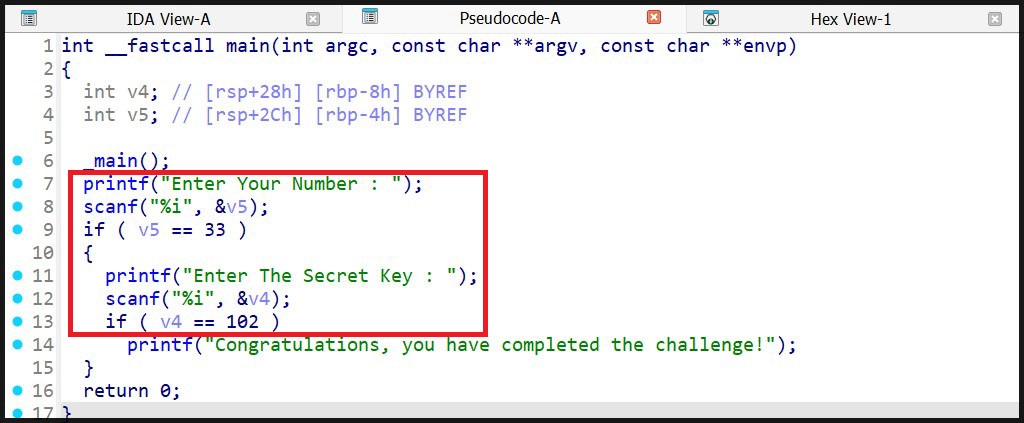
Without much expectation, I started with the easiest secret key challenge I could find. The challenge consisted of a PE32+ (x64) executable containing a hard-coded secret key.
After loading the binary into IDA, the key could be located directly in the code without requiring any additional analysis.
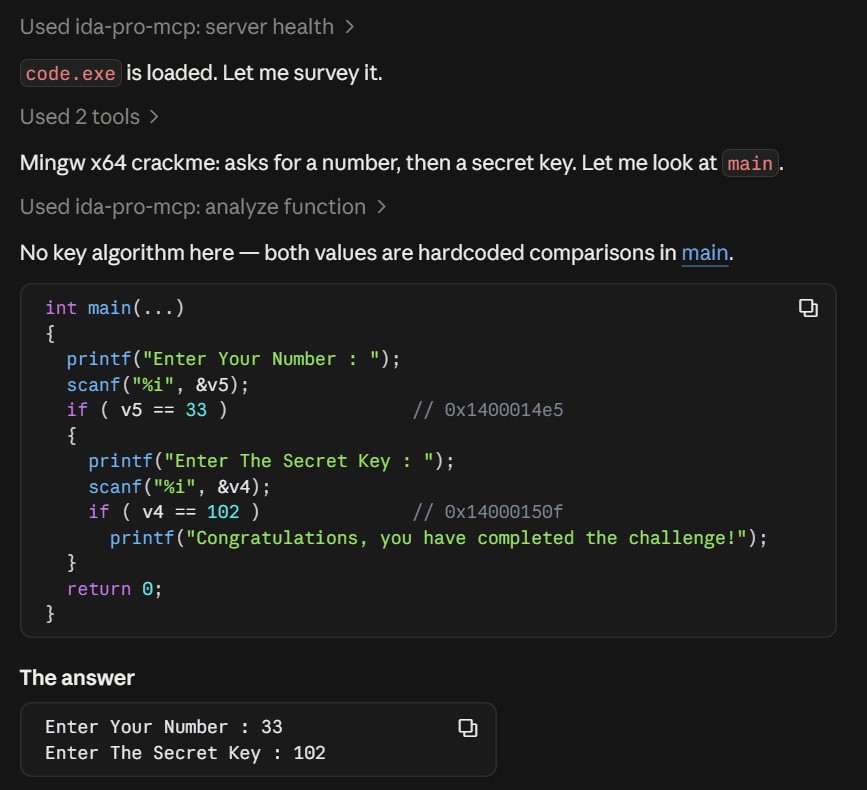
Claude Code was able to identify the hard-coded key and explain the relevant logic with ease.
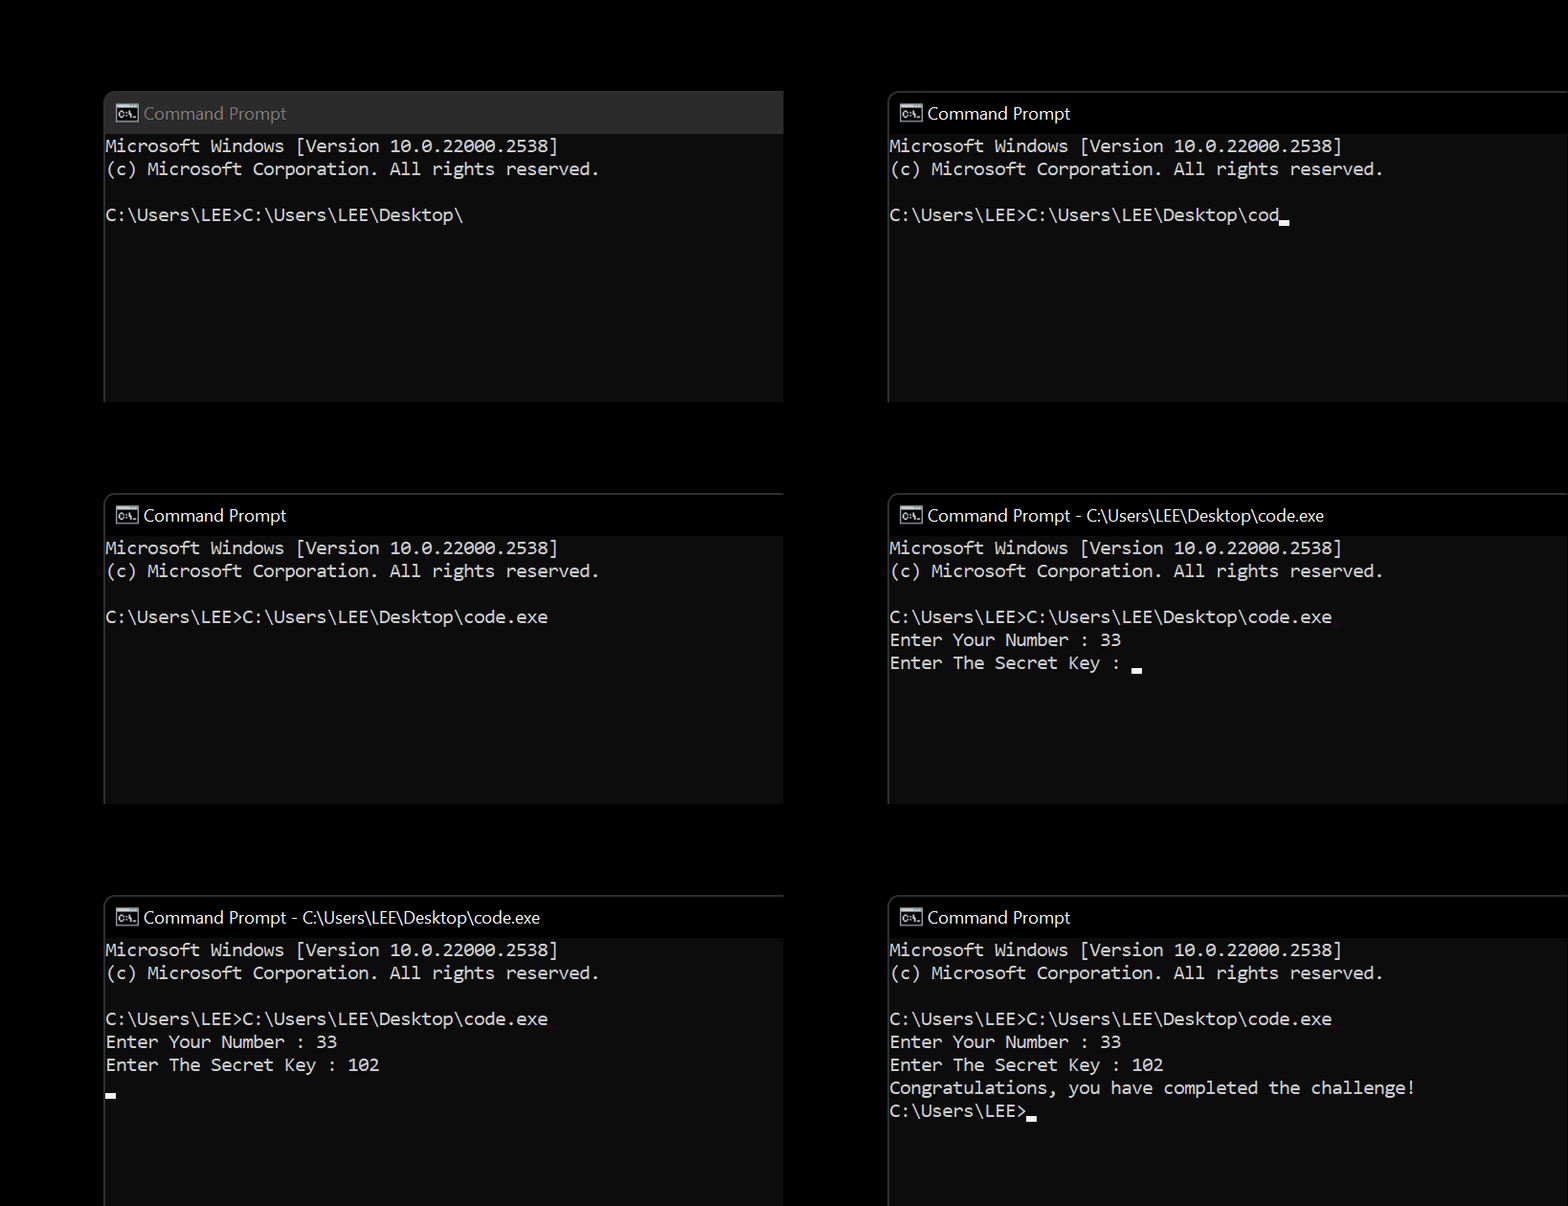
I also checked it in CMD for some additional validation. Now, let’s move on to an analysis that involves actual logic rather than hard-coded values.
Test 2 - Easy keyg3nme
| Field | Value |
|---|---|
| File name | keyg3nme |
| Author | ezman |
| Difficulty | Easy |
| Link | Crackmes |
| Download | Direct Link |
Upping the challenge, I then picked an ELF file. It was still an easy challenge, but this time it used logic.
Loading the file in IDA, you can eventually see the validation routine used for the key.
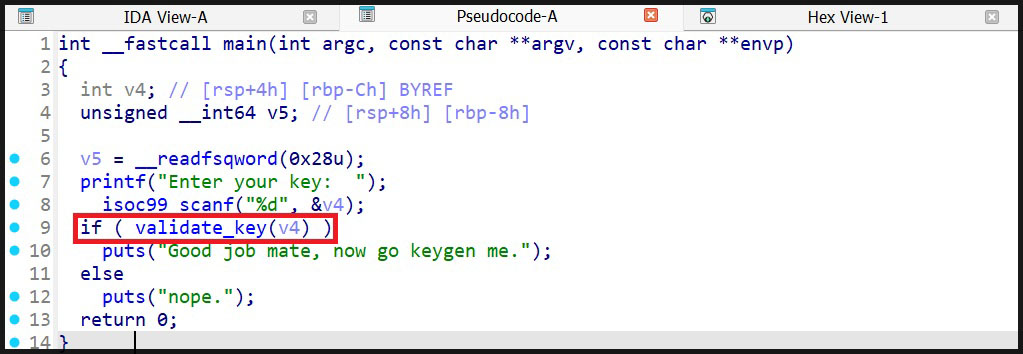
With just one click I was able to work out the logic it uses to validate the key.

The question, though, was whether the model would be able to detect this on its own. After enabling the MCP server in IDA, I went ahead and asked Claude Code.
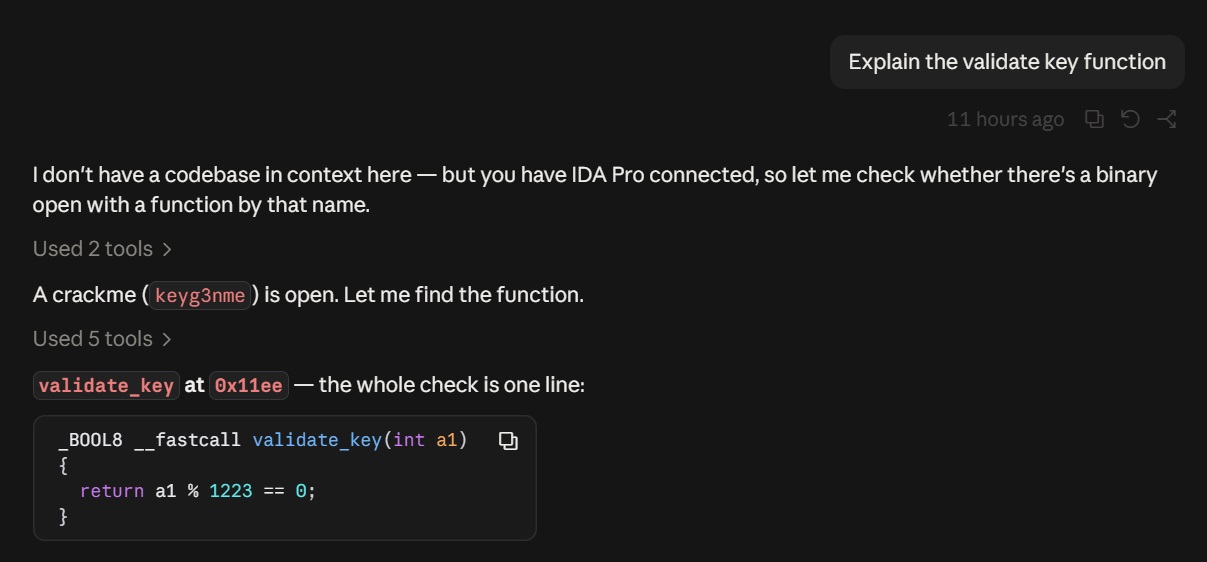 With just five words, it understood:
- What I wanted,
- Which tools it needed,
- That an instance of IDA Pro was open and that a port was available to connect to over MCP.
It was impressive so far, and it answered the question with no problem.
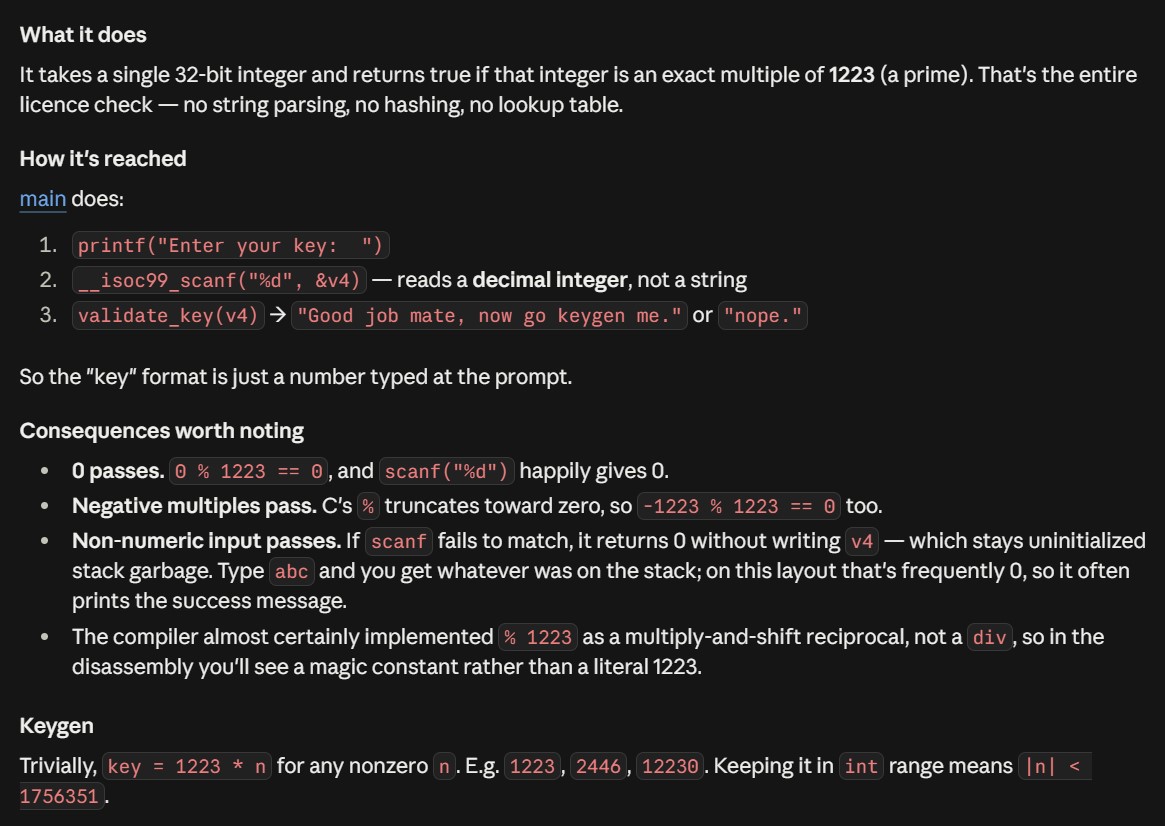
Test 3 - A bit of a challenge
| Field | Value |
|---|---|
| File name | hard_crackme |
| Author | vetementsvmnts |
| Difficulty | Medium |
| Link | Crackmes |
| Download | Direct Link |
The final test is a medium-level crackme that involves another ELF file. This one is a level above the first two tests. Even for me, it would take some time to fully understand what it is doing.
The sample uses three custom hash functions and a final mixing algorithm to generate and validate a unique 24-character hexadecimal sigil based on the user’s name.
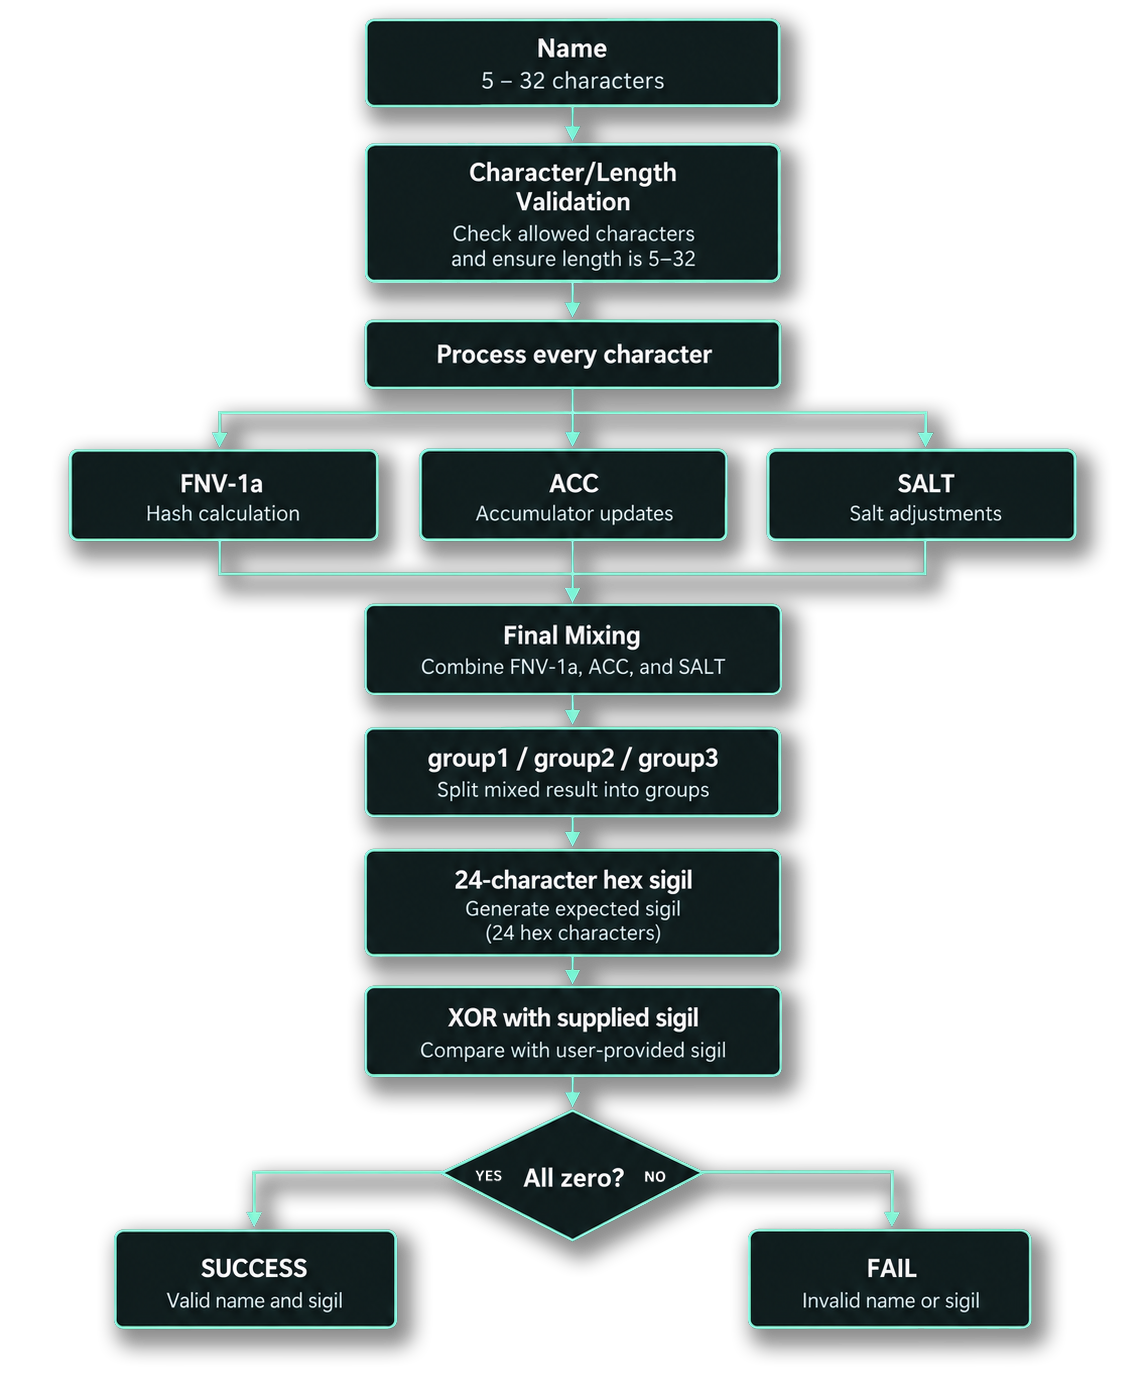
I won’t do a deep dive into the manual analysis here. There is already a very good write-up by kontar0 available if you want to check it out.
First Attempt
The first attempt was really impressive. Claude analyzed the binary very well and quickly understood the overall concept of the keygen.
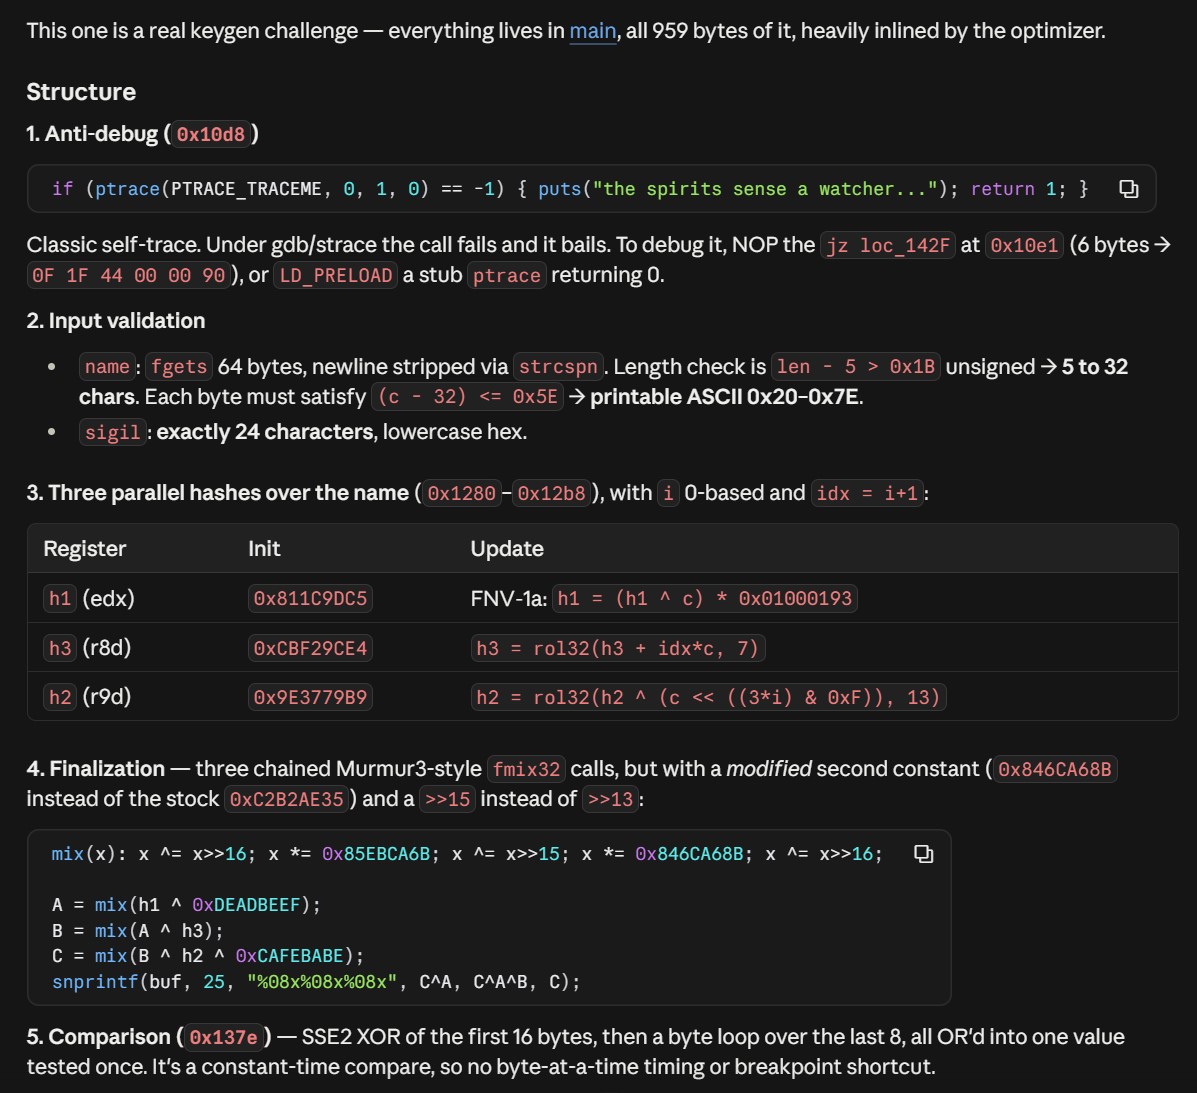
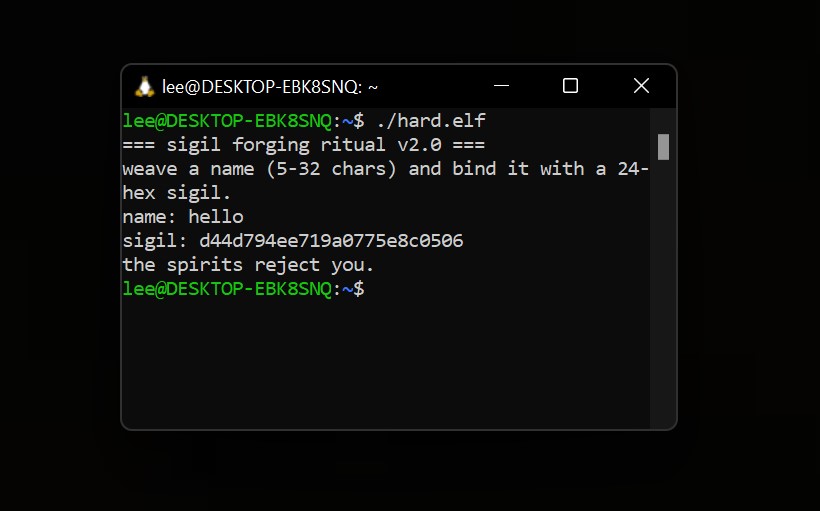
However, after checking the generated value, the overall idea was correct, but the final answer was wrong.
Second Attempt
The issue was a wrong multiplier. Claude had used a constant from memory instead of the actual value from the binary.
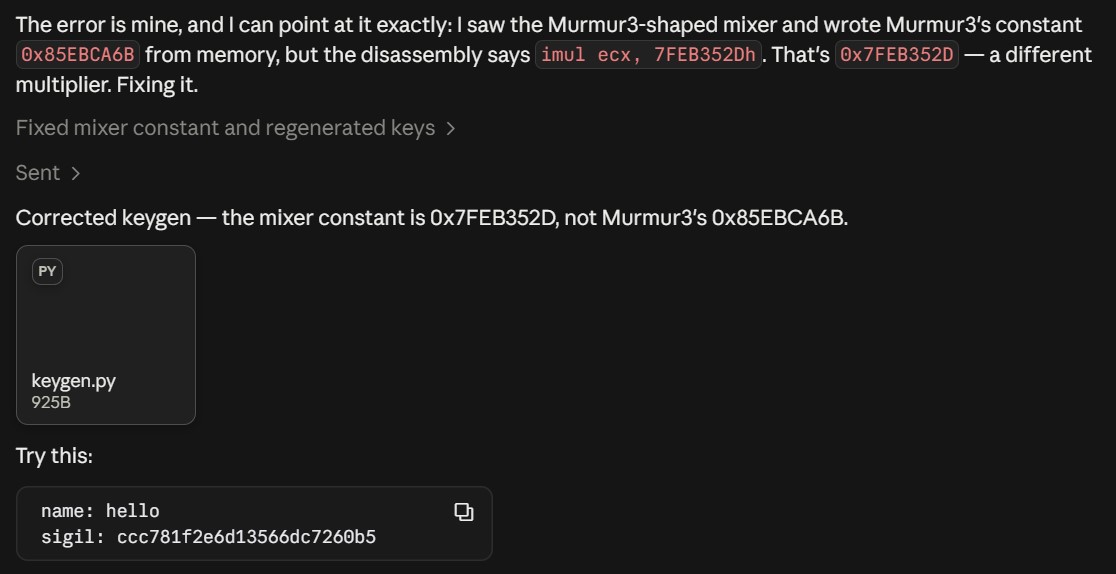
Debugging this so quickly was really impressive. Normally, finding a mistake like this during manual analysis could take hours.
Claude got it right on the second attempt and even explained why its first attempt was incorrect.
It even generated a Python keygen that would output the required value for any name you entered.
import sys

M = 0xFFFFFFFF
def rol(x, r): x &= M; return ((x << r) | (x >> (32 - r))) & M

def mix(x):
    x &= M
    x ^= x >> 16
    x = (x * 0x7FEB352D) & M
    x ^= x >> 15
    x = (x * 0x846CA68B) & M
    x ^= x >> 16
    return x

def sigil(name: bytes) -> str:
    h1 = 0x811C9DC5   # FNV-1a
    h2 = 0x9E3779B9   # golden ratio
    h3 = 0xCBF29CE4
    for i, c in enumerate(name):
        idx = i + 1
        h1 = ((h1 ^ c) * 0x01000193) & M
        h3 = rol((h3 + idx * c) & M, 7)
        h2 = rol(h2 ^ ((c << ((3 * i) & 0xF)) & M), 13)
    A = mix(h1 ^ 0xDEADBEEF)
    B = mix(A ^ h3)
    C = mix(B ^ h2 ^ 0xCAFEBABE)
    return "%08x%08x%08x" % (C ^ A, C ^ A ^ B, C)

for n in (sys.argv[1:] or ["sigil-smith", "claude", "hello", "AAAAA"]):
    b = n.encode()
    assert 5 <= len(b) <= 32, "name must be 5-32 chars"
    assert all(32 <= x <= 126 for x in b), "printable ASCII only"
    print(f"{n:<20} {sigil(b)}")
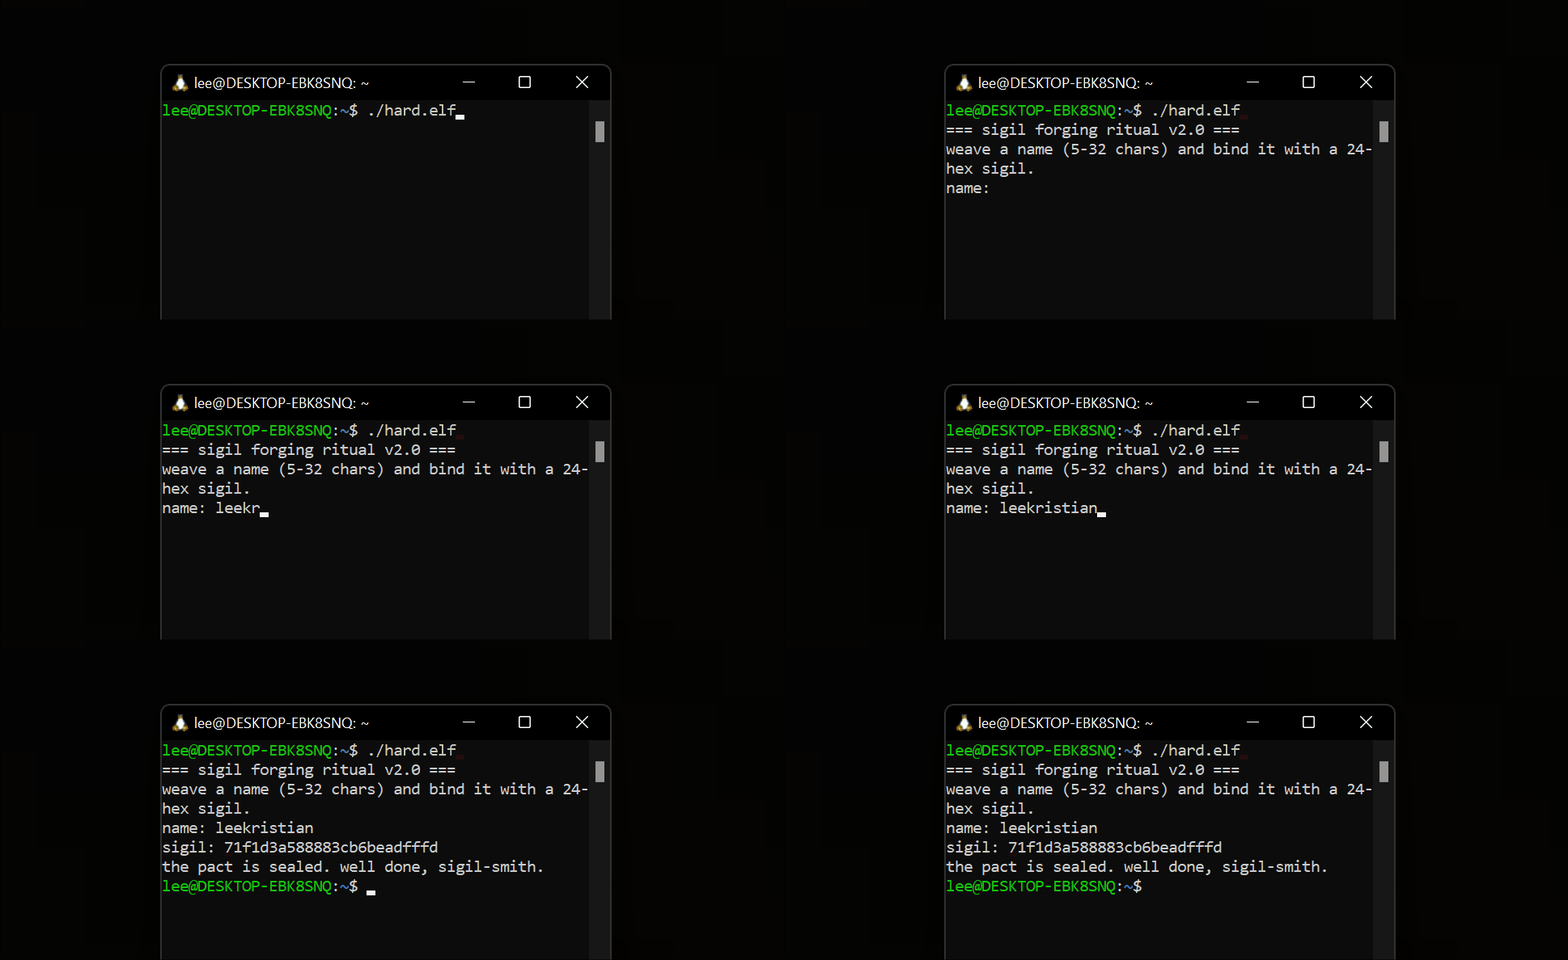
I then tested the generated value, and it actually worked.
V. Conclusion
One of the last skills I imagined AI could handle well was reverse engineering. Disassembly has always been a challenging skill to learn, but AI is changing the way we approach reverse engineering by making complex binary analysis faster and easier to understand.
The speed at which it can analyze binaries and help identify patterns could be extremely useful for CTFs, crackmes, and other reverse-engineering challenges. There is still a lot to explore, especially when it comes to using MCPs to extend what AI can do.
I’ll be exploring more MCPs and experimenting with different workflows in the next few blogs.