
Brutus - Hack The Box WriteUp
I. Overview
| Field | Details |
|---|---|
| Author | CyberJunkie |
| Difficulty | Very Easy |
| Release date | April 04, 2024 |
| Sherlock link | Brutus |
| Certificate | leekristian |
This very easy Sherlock introduces the analysis of Unix auth.log and wtmp logs within the context of a compromised Confluence server. The scenario follows a successful SSH brute-force attack, after which the attacker conducts a series of post-compromise activities that can be traced through auth.log. While commonly associated with detecting brute-force attempts, this investigation demonstrates the broader value of the artifact, including insights into privilege escalation, persistence mechanisms, and limited visibility into command execution.
II. Artifacts Provided
| Artifact | Description |
|---|---|
| Main file | Brutus.zip |
| Size | 5.62 KB |
File Structure
Brutus.zip/
├── auth.log
├── wtmp
└── utmp.py
III. Initial Analysis
I always start my investigation by checking the files provided in the challenge. Before going through the tasks, let us review each one of them.
1. auth.log
We are investigating a successful SSH brute-force attack, and it is expected that the auth log will be the primary file we will spend the most time analyzing during the investigation.
The auth.log file records events related to authentication and authorization, mainly handled by PAM (Pluggable Authentication Modules), SSH, sudo, and other login-related services.
This is a log file and can be opened in a terminal. It may be viewed using any text editor of choice; however, my preferred option is Notepad++.
2. wtmp
It is my first time encountering a wtmp file. Checking its hex code does not reveal much. The top Google search result for “wtmp” is who touched your phone, which is not related to what we are dealing with.
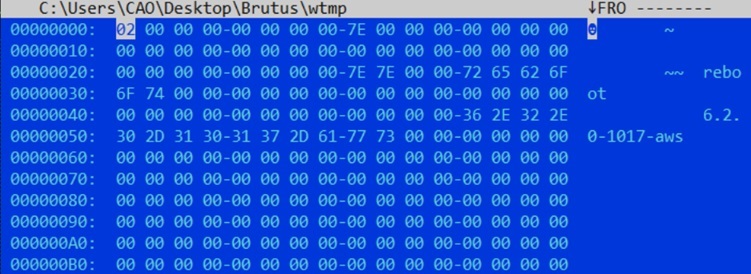
After a few more searches, I found a Tenable Article stating that the /var/log/wtmp file tracks logins, logouts, shutdowns, and reboot events. All audit records are tagged with the identifier “session.” This could be helpful during the analysis, and we need to find a way to either load this file or dump it into a readable format.
3. utmp.py
 This is a non-malicious Python code. I don’t expect there’s a need for a deep script analysis since its a very easy sherlock, so I tried to find the source of the file. After a few searches, I found a GitHub repo with a README section for the file.
python-utmp consists of three modules, providing access to utmp records. It is quite difficult to access utmp records portably because every UNIX system has a different structure for utmp files. Currently, python-utmp works on platforms which provide
getutent,getutid,getutline,pututline,setutent,endutent, andutmpnamefunctions (such as GNU systems like Linux and Hurd) and on System V UNIX systems, as well as BSD systems using a simple utmp structure.
This initially confused me because we are dealing with wtmp files, not utmp files. After a quick search, I compared the two:
utmp vs wtmp Comparison
utmp
- Tracks current login sessions
- File path: /var/run/utmp
- Contains active users only
- Temporary (updated in real-time)
wtmp
- Tracks login and logout history
- File path: /var/log/wtmp
- Contains historical session logs
- Persistent (stored over time)
The script was originally designed for utmp, but wtmp uses the same binary record structure on most Linux systems, so it can often be parsed using the same code.
Now, all that is left is to run the Python script and figure out how to properly use it.
IV. Start of Investigation
For the first two tasks, the flag can be found in auth.log.
Task 1
Analyze the auth.log. What is the IP address used by the attacker to carry out a brute force attack?
This is a brute-force attack, so we should look for consecutive failed login attempts and check if it originates from the same ip.
The first step for me is to search for “Failed password” and “Accepted password”.
The good thing about Notepad++ is that it allows you to highlight all occurrences. You can search for both strings, and from there, you can easily get the answer.

Reveal Hint
All we need to do is cross-check the consecutive failed attempts with the successful ones. Check all successful logins and analyze whether they come after failed ones.
Reveal answer
- 65.2.161.68
Task 2
The bruteforce attempts were successful and attacker gained access to an account on the server. What is the username of the account?
Reveal Hint
“Look at the account that successfully authenticated with the ip on Task 1.
Reveal answer
- root
Now we need to analyze the wtmp file.
Task 3
Identify the UTC timestamp when the attacker logged in manually to the server and established a terminal session to carry out their objectives. The login time will be different than the authentication time, and can be found in the wtmp artifact.
Use the help option to understand how to use the Python script.
Following the instructions, we can dump the output using:
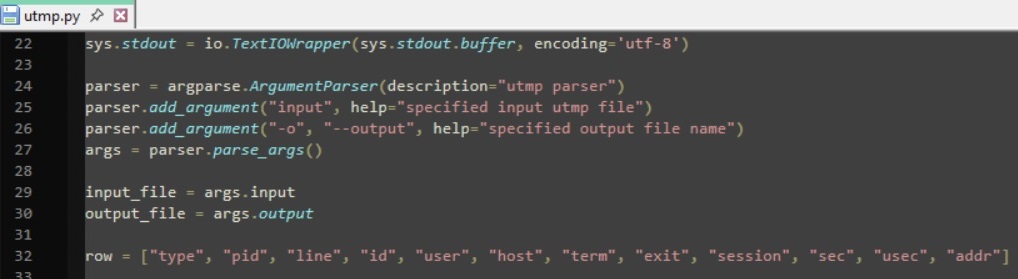
python utmp.py wtmp -o out.log"type" "pid" "line" "id" "user" "host" "term" "exit" "session" "sec" "usec" "addr"
"BOOT_TIME" "0" "~" "~~" "reboot" "6.2.0-1017-aws" "0" "0" "0" "2024/01/25 19:12:17" "804944" "0.0.0.0"
"INIT" "601" "ttyS0" "tyS0" "" "" "0" "0" "601" "2024/01/25 19:12:31" "72401" "0.0.0.0"
"LOGIN" "601" "ttyS0" "tyS0" "LOGIN" "" "0" "0" "601" "2024/01/25 19:12:31" "72401" "0.0.0.0"
"INIT" "618" "tty1" "tty1" "" "" "0" "0" "618" "2024/01/25 19:12:31" "80342" "0.0.0.0"The output is now readable. However, it is better to analyze it in a table. I decided to convert it into a CSV file by changing the delimiter from tab to a comma.
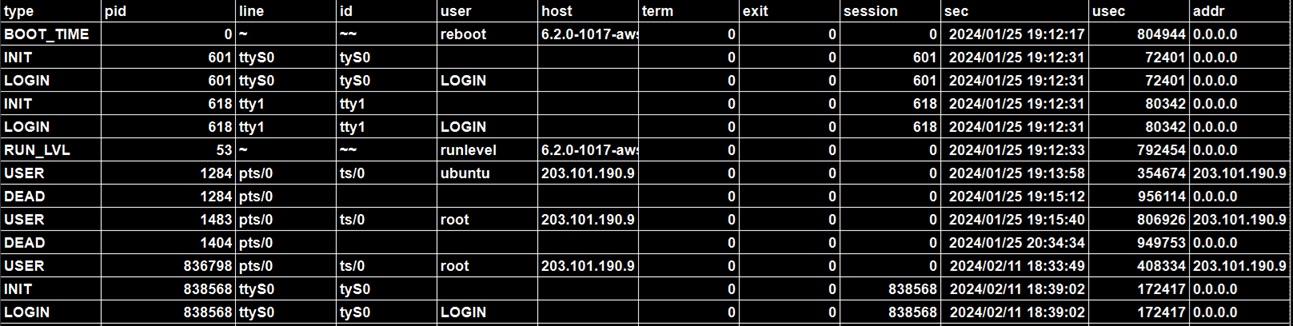
To easily search for the timestamp (we already have the IP from Task 1) all we need to do is search for it in the table.
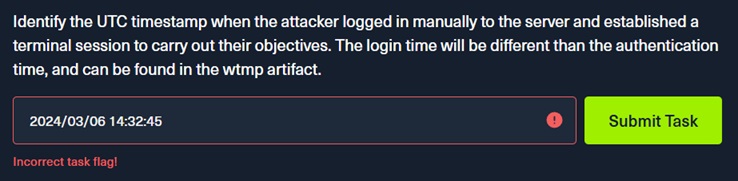
However, after trying to submit it as the answer, it returned an incorrect task flag. I then went back and analyzed the question and realized it was asking for a UTC timestamp.
Going back to the file, it turns out it uses the local time of the computer running the script.
sec = time.strftime("%Y/%m/%d %H:%M:%S", time.localtime(float(sec)))Since I am in Manila, I needed to convert it to UTC. From there, I was able to get the correct answer.
Reveal Hint
To identify the correct timestamp, first locate the relevant entry using the available IP address. Then carefully check how the timestamp is represented in the table. It reflects the local time of the system where the data was generated, so it must be converted to UTC before submission.
Reveal answer
- 2024-03-06 06:32:45
Going back to auth.log
Task 4
SSH login sessions are tracked and assigned a session number upon login. What is the session number assigned to the attacker’s session for the user account from Question 2?
To find the session number, first identify the successful SSH login.
Right after the login, the system records session initialization:
pam_unix(sshd:session): session opened for user root(uid=0) by (uid=0)This confirms a session was created for the SSH login.
After the confirmation we can now see the session ID recorded by systemd-logind
Reveal Hint
Extract the session ID from the systemd-logind entry, which records it as the official session number assigned to that login.
Reveal answer
- 37
Task 5
The attacker added a new user as part of their persistence strategy on the server and gave this new user account higher privileges. What is the name of this account?
The remaining questions are pretty straightforward. To find the new user, simply search for useradd logs. These show the creation of the account (name along with its UID, GID, home directory, and shell).
useradd[2592]: new user: name=cyberjunkie, UID=1002, GID=1002, home=/home/cyberjunkie, shell=/bin/bash, from=/dev/pts/1Reveal Hint
Check for the username in logs that show account creation activity, specifically useradd
Reveal answer
- cyberjunkie
Task 6
What is the MITRE ATT&CK sub-technique ID used for persistence by creating a new account?
To answer this, since we have identified that the attacker created a new user account, map this behavior to the MITRE ATT&CK persistence technique “Create Account,”
Reveal Hint
Reveal answer
- T1136.001
Task 7
What time did the attacker’s first SSH session end according to auth.log?
To determine when the attacker’s first SSH session ended, locate the SSH session termination events in auth.log tied to the attacker’s connection. The key indicators are the sshd disconnect and session close messages:
Reveal Hint
ip-172-31-35-28 sshd[2491]: Received disconnect from 65.2.161.68 port 53184:11: disconnected by user
Reveal answer
- 2024-03-06 06:37:24
Task 8
The attacker logged into their backdoor account and utilized their higher privileges to download a script. What is the full command executed using sudo?
This is pretty easy because this is the only downloaded script in the entire auth.log. To find the answer, focus on the sudo log entry for the user created in Task 5. The full command executed is shown after “COMMAND=”.
Reveal Hint
Search for sudo: cyberjunkie : TTY=pts/1 ; PWD=/home/cyberjunkie ; USER=root ; COMMAND=
Reveal answer
- /usr/bin/curl {GITHUB LINK}
V. Learnings / Conclusion
This is a very good Sherlock for beginners. I only found the third question a little difficult because of figuring out the time zone. The rest is straightforward and enjoyable, making it a great sherlock overall.
From this investigation, I have learned the following:
- I have now become familiar with Unix logs, particularly authentication logs such as the wtmp file.
- Always read the manual for files, it may save you time.
- A wrong time does not necessarily mean a wrong answer, it may just be due to a different time zone.
Feel free to reach out via leekristiancao@gmail.com if you have questions, suggestions or need more details about this analysis.